Keeping your shoes near the front door makes sense. You put shoes on before you leave the house and take them off when you get home, so why not keep them as close as possible? We keep a few pairs of shoes near our entry, currently in a basket, but I’ve been dreaming of a more out-of-sight solution.
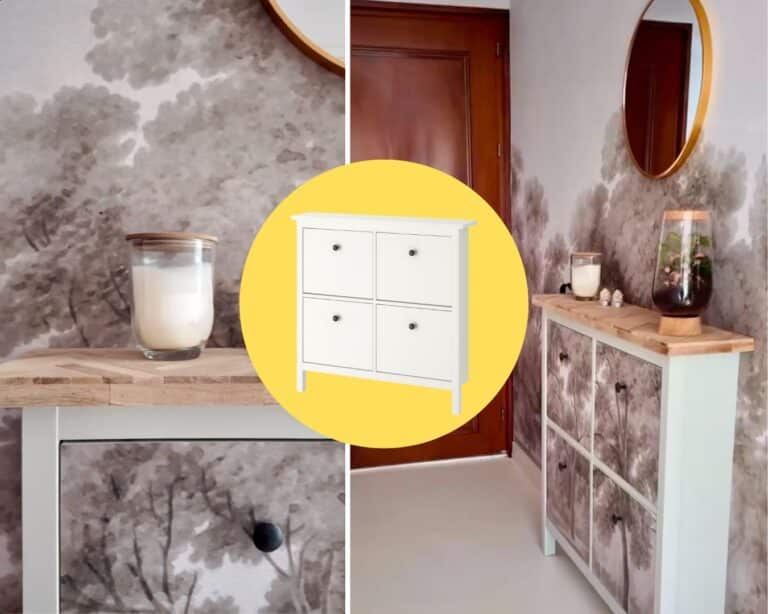
I was thinking about getting a tilt-out shoe cabinet for our hallway since these pieces have a nice, narrow footprint. When I saw this hack from Alexia Maitrejean @alexia_s_world, it got my wheels turning. Alexia makes an IKEA HEMNES shoe cabinet look like a beautiful, custom console table for their entryway, and I love the idea.
Sure, you could leave the cabinet as-is, but Alexia comments, “I didn’t want to leave it white, and I thought it would be a shame if it hid the beautiful wallpaper.” Her solution was to put the wallpaper on the front of the cabinet to tackle both problems. But if you don’t have wallpaper on your wall, you can still replicate this hack to create a fun, personal statement piece.
What You’ll Need
- 1 IKEA HEMNES shoe cabinet
- Wallpaper
- Wallpaper glue
- Brush to apply glue
- Smoothing tool
- Pencil
- Sandpaper
- Paint
- Paintbrush/ roller
- Mat knife
- Wooden hobby sticks
- Adhesive
Create Custom Stylish Storage Using the HEMNES Shoe Cabinet
1. Prep the HEMNES Shoe Cabinet
Assemble the HEMNES shoe cabinet according to IKEA’s instructions. Leave the doors and hardware off for the time being.
2. Consider Your Wall
There are a few things to think about when it comes to the wallpaper for this hack. First off, Alexia starts with nothing on her wall. They put up the wallpaper (from @rebelwalls), then cut a piece from the section that is behind the cabinet.
If you’re working with a wall that already has wallpaper, you could try to remove the wallpaper. But it might be easier to get a smaller piece to match. Alternatively, you could find a complementary pattern.
If you prefer not to have wallpaper on the wall, you can just add it to the cabinet. Therefore, this part of the process varies depending on the individual DIYer.
3. Add Wallpaper to the Doors
Lay the front of a door on top of the wallpaper to mark the size. Trace it with a pencil, then cut. Attach the paper to the door using wallpaper glue, repeating the process for each door. Use a smoothing tool to get rid of any creases and wrinkles.
4. Paint the Cabinet
Alexia mixed several different shades of paint to get the desired color for her cabinet. She didn’t use a base coat but sanded the cabinet lightly to help the paint stick.
I love using a paint-and-primer combo. Make sure to clean the cabinet before painting to eliminate dust and debris from sanding.
5. Add the Wood Top
Alexia got the sticks for the top of the cabinet from Easy-Sticks. The company features sticks already cut and stained, making DIY projects like this much easier. However, you can find hobby sticks at craft stores, online, or make your own.
Use your favorite adhesive to secure the boards in place. Alexia created a beautiful herringbone pattern and trimmed out the sides and front edges for a nice, clean look.
6. Install the Cabinet and Hardware
Finally, attach the cabinet to the wall using proper mounting hardware. The HEMNES shoe cabinet comes with pre-drilled holes in the back to make this part easier. Add the doors, then replace the hardware.
A Shoe Cabinet That’s Not Just for Shoes
This might be a shoe cabinet, but that’s not its sole purpose (yes, that pun was on purpose, sorry). I had a cabinet similar to this in my bedroom once upon a time. We used part of it for shoes, but one section was for rolled up T-shirts and another was for PJs.
If you plan to do this in your entryway, it’s great for shoes. However, you could also use it for hats, a few rolled-up hoodies, sweatshirts, etc. The goal is to create a storage solution that’s practical and functional, but also stylish since it’s one of the first things people see when they enter your house.
What do you think? Do you like the wallpaper idea, or would you do something like this HEMNES shoe cabinet hack? If you have more space to fill, you can also double-up your HEMNES cabinets.
Check out Alexia’s DIY project and follow her on Instagram @alexia_s_world for more fun ideas and inspiration.
Got an IKEA hack that you can’t wait to show off? Send it our way and you could be our next featured hack.
