

Materials: – your Henriksdal slipcovers – fabric paint (I’ve also heard good things about silk screen paint) in the color(s) of your choice (I mixed together 2 colors, and wound up using a total of 22 ounces of paint) – 1 small artist brush – 1 slightly larger brush – a bowl for mixing/holding the paint – a digital image of a pattern that appeals to you – a few small pieces of cardboard (like the size of a matchbox) – a washable fabric pen
Description:
Step 1: Create a paper stencil of your pattern. I just printed out a full-page photo of a fabric I liked on typing paper and then cut out the pointed oval shapes with an exacto knife. Now I had a stencil that I could use to create the pattern vertically on my chairs! (I made a few of these stencils since the process of tracing the stencil onto the fabric caused the edges of the stencil to get a little wonky over time.)
Step 2: Trace the stencil onto your fabric. Pick a starting point for your stencil that will act as a guide to keep the repeating pattern level -I chose the seam along the top of the chairs and it worked really well.

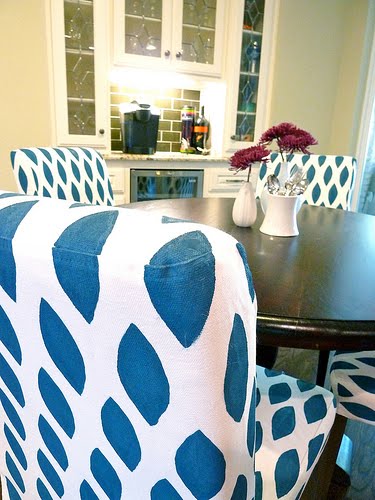
Tip: If your pattern will be wrapping around a corner, think about where you want the pattern to stop. As you can see in the photo below, I let the pattern wrap around the top of the chairs from the front to the back, and from the bottom seat cushion onto the lower sides of the chair – but I stopped the pattern at the vertical seam between the front and back of the chair (if that makes sense). Deciding where to break the pattern will help prevent the pattern from meeting up in an unattractive or weird way.
You don’t have to use a fabric pen to trace your pattern, but I highly recommend it – it’s great for those “oops” moments.
Step 3: Mix your paints. Don’t fret if Michael’s doesn’t sell the exact color of fabric paint that you want – you can just mix it up yourself to create a custom color. I mixed 1 part Marine Blue with 2 parts Turquoise to create the deep teal color for my chairs. Tip: When storing my bowl full of paint between painting sessions, I like to cover the bowl with plastic wrap and press down the plastic wrap so that it is touching the paint and the sides of the bowl, and then stick it in the fridge. This helps keep the paint from hardening.

Step 4: Fill in the stencil with paint. This is the part that takes f.o.r.e.v.e.r. Like for reals. Tip: Here’s what worked best for me – I used the small artists brush to do the outline of 2-3 ovals, then filled them in with the larger brush. Do only a few of them at a time or else the outline will get kind of thick and crusty and you’ll be able to see it even after the paint dries. Using a small brush was great for the outline because it lets you get really crisp lines. Also, when you reach creases in the fabric (like where the back rest meets the seat cushion) those small pieces of cardboard come in handy – just stick them in the crease to keep the paint from smudging.

And that’s it! Easy, right? And since all of this was done using fabric paint the slipcovers are 100% washable. For more info, stop by www.itsgreattobehome.net!

~ Liz @ It’s Great To Be Home