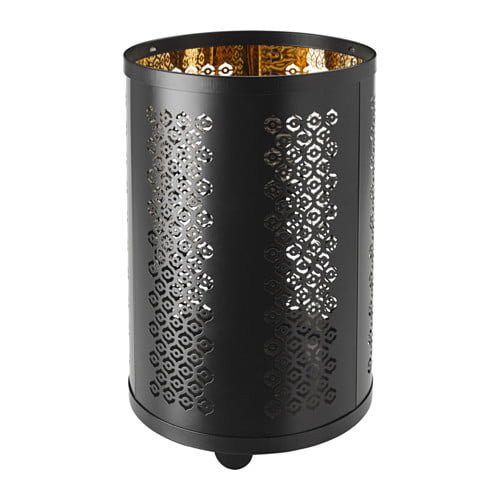
I have loved perusing the many surprising and beautiful ways in which you guys have hacked up run-of-the-mill IKEA bits and bobs and – inspired by this – I have made my own!
Necessity was the mother of invention here… I picked up this lantern for no other reason than I thought it was beautiful, and really had no use for it, but I REALLY needed some soft bedroom lighting for my new wife and I (thank you!).

You will need:
- 1 x STABBIG lantern for block candle
- 1 x DIODER LED 4-piece lighting strip set
- 1 x Rotary Cutting tool (Dremel or similar) OR hacksaw (if you have the strength of will!)
- 1 x Drill with appropriate (for drilling metal) dia. 6mm min. drillbit
- 4 x roundhead (essentially NOT countersunk) screws
- 4 x appropriate (to your type of wall) wall plugs
There are 3 central sections that make up the cylinder – I used two of these and – placing them in the base – I marked a line on the base that spanned the width of the section.
I then marked out a ‘tab’ of about 1cm thickness and 2.5cm from each edge – this would be where the wall fixings went. I wasn’t really bothered about where I put the holes, but as a guide, I placed them close to the dent in the base. I used 6 x 30 mm galvanized steel screws – but whatever’s lying about that’s not countersunk will do – although I suggest a minimum 6mm dia.
NEXT, using a convenient corner die (a brick) I hammered the tab to 90 degrees. You want the edges of the base to be tight to the wall so be careful when you bend!
NB:- I also drilled a dia. 10mm in the base, close to the bent wall bracket in order to put my LED strip cables through.
THEN… err… I spray painted them gold – there is no real reason to do this – I just had some spray paint lying about!
THE FINAL EFFECT… Yes that’s booze in the background – a must when hacking IMHO!
PEN-ULTIMATELY I fixed two LED strips from the DIODER kit onto the insides of the two sections I wanted to use – I used double sided tape in the end as the glue gun didn’t adhere that well to the curved inner surface.
FINALLY all you have to do is line them up so that they are level and equidistant from your head board (IKEA hacked – of course!), mark the holes, drill, wall plug and screw the bases to the wall…
AND … put the connecting cables through – attach to the LED strips and slot each section into place – PHEW! Not bad for a few hours work…
You can see the final effect below:
My wife’s initial reaction: “is one slightly lower than the other?”
“No babe – your glasses must be wonky”…
I thought about cutting the third section in half and screwing it behind the lights for more reflection, but… Nah! You could also spray the wall behind directly, or use some reflective card – or even a mirror!
I hope this inspires you, like this site has inspired me! Comments, questions and suggestions welcome!


