If you’re dealing with a “postage stamp” sized kitchen, then Sara’s ingenious IKEA hack is about to become your new best kitchen helper. Say hello to the LACK mini kitchen island – a space-saving solution that will add so much storage and functionality to your small kitchen.
I’m sure you’ve got at least one LACK table collecting dust in a corner or languishing in storage. Or you can possibly pick one up for cheap (or free!) from Facebook Marketplace. Well, it’s time to get your hands on those tables because they’re about to get a serious upgrade.
Sara’s idea combines two LACK side tables with some spare wood to create a small kitchen island that’s as versatile as it is cute. And you can push it out of the way when not in use.
Materials:
- 2 IKEA LACK side tables
- Liquid Nails
- Rustoleum Metallic Flat Soft Iron spray paint
- Scrap wood (or a third LACK side table)
- Marble contact paper
- 4 Caster wheels
Quick And Easy Mini Kitchen Island Tutorial
Step 1: Attach tables
Apply Liquid Nails adhesive in a zigzag shape on the bottom of each leg of one of the tables. Carefully stack the first table on top of the other table. You’ll need to put some pressure on the tables, so it’s probably a good idea to turn them upside down to connect them. Lay some heavy items like books to weigh the table down. Wait for the adhesive to completely cure before moving on to the next step.
Step 2: Spray the tables
As the tables were looking a bit dingy, I decided to give them a new coat of paint. I went with Rustoleum Metallic Flat Soft Iron spray paint. If you use spray paint, you don’t need to prime. And, of course, if you’re using new IKEA LACK side tables, you can omit this step unless you want to change the color to suit your kitchen style.
Step 3: Add the bottom shelf
If you have three LACK tables, you could use the top from the third table as the bottom rack. I only had two, so I used scrap wood I had in the garage. Measure the distance between two legs and cut two pieces to go on opposite sides of the table legs (parallel to each other). After cutting the wood pieces, I also spray-painted them in the same color as the tables.
Cut multiple pieces of wood to run perpendicular to those. Attach using a Kreg Jig.
Step 4: Wrap the countertop
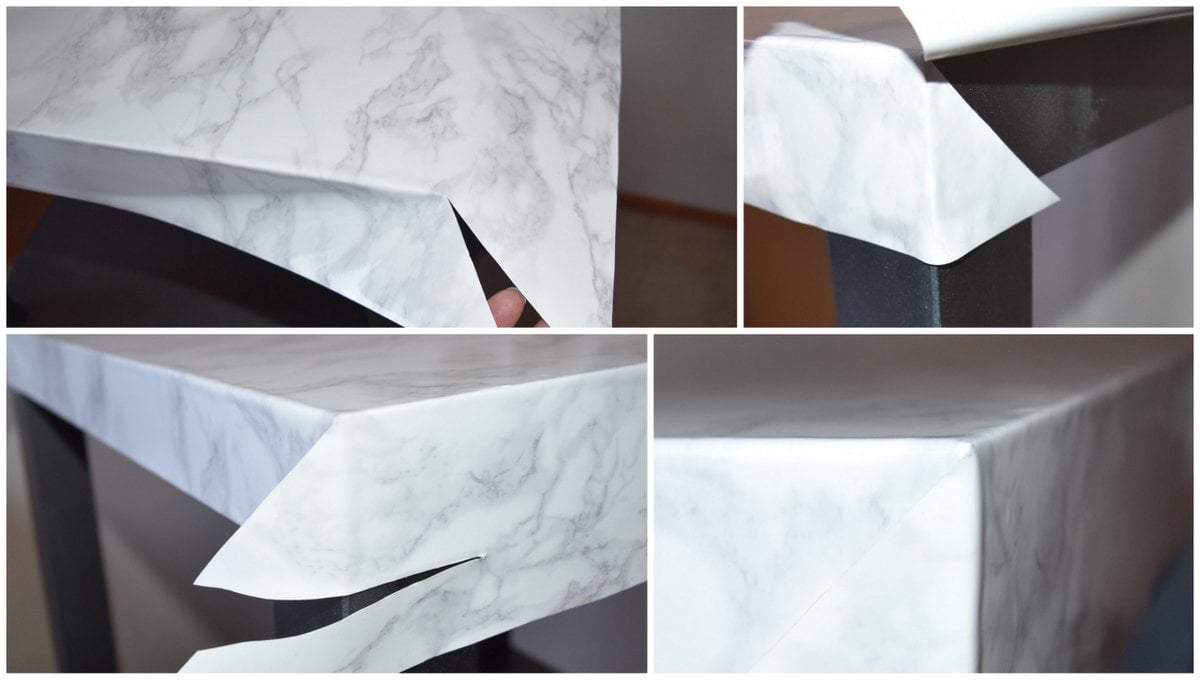
Use EZFauxDecor on the tabletop. You apply it the same way you apply contact paper, but I can’t really call it contact paper because it’s so much thicker and more durable. It’s somewhere in between contact paper and laminate and can stand up to heavy use, water, etc. It is a really beautiful product and looks shiny and reflective like real marble. The one I used is the white, gray marble. Pay attention to the corners and follow my photo instructions above to get a smooth finish.
I only vinyl-wrapped the top table, but in retrospect, I should have extended this protection to the bottom shelf as well. The LACK’s laminate surface isn’t particularly resistant to moisture or minor impacts. Moisture (unless quickly wiped off) can cause the laminate to bubble, and the edges are prone to chipping with regular use. By wrapping both surfaces, I’ll significantly extend the life and durability of my DIY mini kitchen island. But oh well, you live and learn and hack again.
Step 5: Embellish as you like
Add decorative hardware. I took 4 L-shaped brackets, drilled holes, and attached them with screws. Decorative corner protectors and brass brackets will look great, too, but I used what I had. This step is optional, and you can leave out or add any decorative elements on the mini kitchen island.
Pro tip: Adding corbels can transform your LACK hack into an on-trend piece, mimicking popular arched tables. Curves add a softness that balances out the LACK’s boxy silhouette, creating a more visually interesting focal point in your kitchen
Step 6: Fill your mini kitchen island with goodies
Load the shelves with kitchen items, and you’re done.
~ by Sara


