
Who says bedroom furniture has to stay in the bedroom? When it comes to DIY, the best projects break the rules and that’s exactly what Sumi and Matty of @interiorfun.berlin did with this amazing IKEA hack.
Using the popular MALM dresser from IKEA, the creative duo transformed it into a sleek, storage-packed kitchen island that looks anything but off-the-shelf.
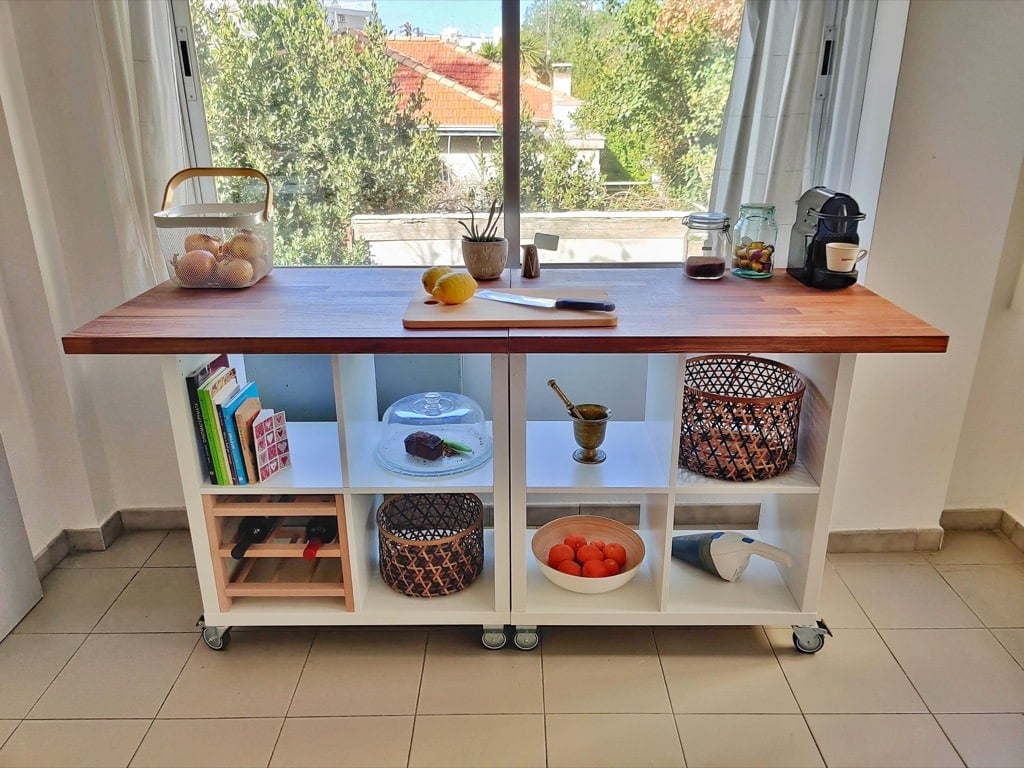
With a few basic tools, pre-cut panels, and a classy countertop, they crafted a custom centerpiece that’s perfect for small kitchens or open-plan layouts that need extra prep space and storage.
Could your kitchen use a makeover like this? No matter where you live, you can replicate this hack and make it your own.
Use Sumi’s project as inspiration and adapt it to your kitchen layout, color palette, and design style.
Kitchen Island DIY Tools and Materials Checklist:
- 1 IKEA MALM or STORKLINTA 6-drawer dresser (55 ⅛” x 18 ⅞” x 29 ½”)
- 1 oak or butcher block tabletop (78” x 31.5” x 1”)
- Wood oil
- 4 legs to elevate the dresser
- 2 IKEA ENKÖPING strips (or timber to make DIY baseboards/trim)
- Regular brackets
- Nuts and bolts
- Shelving bracket
- Acrylic lacquer in the color of your choice
- Pre-cut wood panels for the end shelving unit
- Wood stain
- Basics — saw, drill, screw gun, tape measure
Cooking Up a High-End Kitchen Island Using the STORKLINTA Dresser

1. Assemble the Dresser
Assemble the STORKLINTA dresser according to IKEA instructions. Sumi and Matty (based in Germany) used the MALM dresser, but Sumi pointed out that the MALM comes in different iterations and names depending on where you shop. The US equivalent is the STORKLINTA.
2. Make and Attach the Shelving Unit
The DIY duo used pre-cut wood panels, nuts, and bolts from a local hardware store to create the shelving unit on the side of the island. Make the width of your shelves longer than the side of the dresser. The idea is to create an overhang once you add the tabletop to fit stools underneath.
For the depth, make it deep enough to hold pots, cookbooks, etc. Stain the shelf to match your tabletop (Sumi used a teak wood stain), then attach it to the dresser with shelving brackets.
3. Add the Legs and Trim
Elevate the island to make it the appropriate height using basic legs. Sumi and Matty used the METOD legs, which aren’t available from IKEA US (the closest are the SEKTION legs). However, since you’re going to hide the legs anyway, you can use any kind you want.
Just make sure the legs you choose are the right height (you want your island to match the height of your kitchen countertops). It’s also important to choose sturdy legs that can support the weight of the dresser (including the tabletop) and anything you plan to store in it.
Sumi used IKEA RINGHULT baseboards to trim out the bottom of the island and hide the legs. These aren’t available from IKEA US, but the ENKÖPING deco strips are another option. You can also use basic timber or prefab baseboards painted white.
4. Time for Paint
Use the acrylic lacquer to paint the back of the dresser, shelf brackets, and the exposed rear of the shelving unit. Let dry, then add a second coat.
5. Add the Countertop
Oil the countertop and attach it to the top of your dresser and shelf unit using basic brackets. The tabletop’s length should equal the sum of the length of the dresser and the depth of the shelf unit. Leaving a slight overhang on the sides is optional, but making them even gives a nice, sleek look.
The width of the tabletop should match the width of your shelving unit, extending it beyond the depth of the dresser. This is the overhang that was mentioned earlier, which gives you a place to slide a couple of stools.
Ways to Customize Your Kitchen Island DIY
If you prefer a bit more flexibility in your kitchen, instead of stationary legs, consider adding heavy-duty wheels. We have a rolling island in our kitchen, and it’s a game-changer. We move it around when we need more space for entertaining, which is ideal for our smaller home.
If adding wheels, be cognizant of the trim on the bottom of the island. Ideally, you want casters with brakes so the island doesn’t move when you need it to stay put. You don’t need brakes on all the casters — two should suffice, but make sure you can access the brakes easily.
Ready to give this project a try? Check out the hack (complete with an original music track created by Matty), and make sure to follow the dynamic DIY team @interiorfun.berlin.
Got an IKEA hack that you can’t wait to show off? Send it our way or tag us on Instagram @ikeahackersofficial, and you could be our next featured IKEA hacker.
NEXT: Explore kitchen island hacks.

The Kitchen Peninsula Hack DIYers Can’t Get Enough Of
Using the KALLAX unit in the kitchen is nothing new. It certainly works in the busiest room in the house, providing storage and serving as a kitchen peninsula or island.…

How a $45 IKEA Shelf Became My Small (But Cute) Kitchen Island
We may not all have Instagram-worthy kitchens with their sprawling islands, but a kitchen island need not remain a pipe dream, even for a small kitchen. Again, IKEA’s trusty KALLAX…

This DIY Kitchen Island is Actually an IKEA IVAR
Workspace in the kitchen of a rented home is often less than ideal. That’s the challenge facing Ehami, a Japanese DIY Instagrammer who shares her transformations on @ehami123. Living in…

How to build a kitchen peninsula with IKEA
Add a kitchen peninsula or kitchen island is one of the best ways to add storage space and counter space to the kitchen. Depending on the layout of the kitchen…

Just 4 things to make this affordable IKEA Kitchen Island
HY (@yatt_azml) shared her compact IKEA kitchen island hack on Twitter and it caught my eye. She shows how easy it is to make a compact, and affordable kitchen island…
1 big or 2 small units: This portable KALLAX kitchen island is so useful
I’ve always wanted to have a kitchen island and when moving into a new apartment, our small kitchen and limited countertop surfaces gave me the opportunity to create my dream…