
Multifunctional furniture is a lifesaver for small spaces. And with a little IKEA hacking, even the simplest shelf can become the hardest-working piece in your living room.
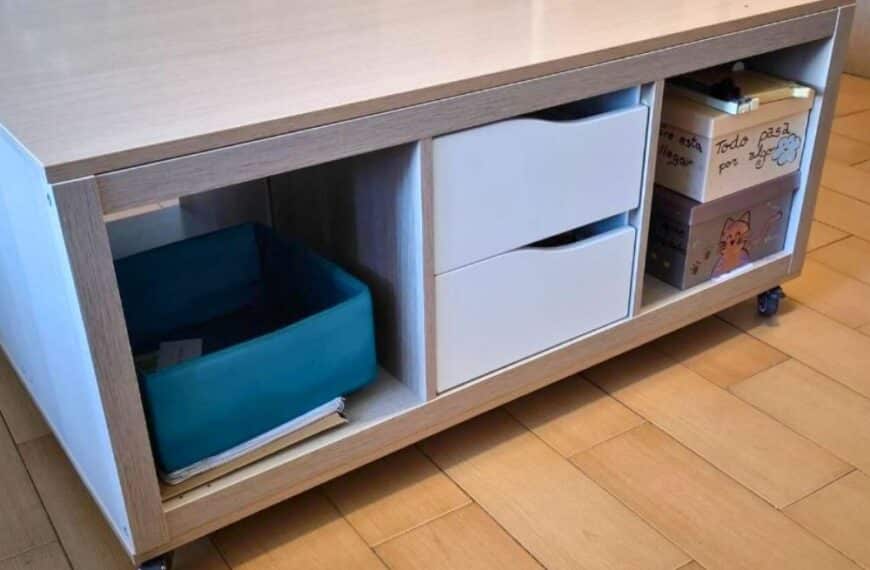
Eli and Santi @my magical refuge upgraded a basic IKEA KALLAX unit into a sophisticated and stylish coffee table, complete with hidden storage and a lift-top table. This custom creation does much more than just provide a place to stash the remote.
A little elbow grease and a lot of imagination go a long way. Now, this reimagined KALLAX is a place to tuck items out of sight, prop up your feet, or make it easy to eat dinner while you’re binging your favorite shows. Doesn’t that sound nice?
Turn Your KALLAX Into a Lift-Top Coffee Table
What You’ll Need
- 1 IKEA KALLAX (30⅛” x 30⅛”)
- Wooden slats
- Glue
- Paintable sealant or caulk
- Sander
- Paint and primer
- Pine board (for top)
- Wood stain
- Plywood for the bottom
- Hammer and nails
- Hinges
- Lift mechanism for the table top
- Basics — Hand saw, tape measure, pencil, drill, screw gun
1. Assemble and Clean the KALLAX unit
Put together the KALLAX according to IKEA instructions if you’re buying new. But check out places like Facebook marketplace or even your local IKEA’s as-is section first to score a great deal. Clean the piece really well and let it dry before attaching the trim.
2. Add Trim to KALLAX shelving
Measure and cut wooden slats to size to fit the edges of the KALLAX. The added trim gives the piece a bit more character and more of a customized look. Fill all of the gaps with a paintable caulk or sealant.
3. Prep, Prime, and Paint KALLAX unit
Sand everything lightly and wipe away all of the dust. Apply primer, let it dry, then add paint. The hacker advises using smooth, even strokes to get a nice, clean finish.
4. Prepare Bottom and Top Panels
Attach plywood to the bottom with nails. Cut the pine board in two, or get it cut at the home improvement store. Make sure to make them larger than the KALLAX so they overhang the sides.
5. Install the Lift-top Mechanism
Stain the pine boards with the color of your choice. Attach one board with regular hinges (in the middle of the KALLAX) to cover half of the KALLAX unit.
Attach the other with the lift mechanism; this will be your liftable table side. Install the lift mechanism according to the instructions that come with it.
Breaking Down the Budget
Cost of this hack:
- KALLAX (if buying new) — $44.99
- Three long slats (to cut to size) — $10
- Pine board — $24
- Plywood — $12
- Hinges/Lift mechanism — $20 (found on Amazon)
- Paint and Primer — approx. $40 (the hacker already had some leftover from other projects)
- Miscellaneous supplies – $20
Total: Roughly $171
Make A Lift-Top Coffee Table for Less
Depending on your perspective, $171 might seem pricey for a DIY. However, if you do a lot of projects, the odds are good that you have some of these things already, like primer, caulk, and nails. You could also likely find a used KALLAX; it’s a popular IKEA piece, and save some money that way.
Some commenters repeated that it seemed to be more cost-effective to just buy a new table instead of spending the time to make this. Technically, they’re not wrong.
I saw some similar pieces on Amazon for about $140 to $200. Of course, if you already have supplies and can score a KALLAX for about $15, you could make it for a lot less.
Either way you look at it, I think the finished product looks really good, and the stained top and trimmed-out edges give it a more substantial, high-end look. Plus, as one commenter mentioned, there’s added value in doing something yourself.
You get a sense of accomplishment and bragging rights to go along with your new piece of furniture. And that is often priceless.

Check out the hack to see just how the creator pulls it off, and make sure to follow Eli and Santi @my magical refuge for other inspiring ideas.
Have a project of your own you’re proud of? Share your hack for a chance to be featured on the site.
NEXT: See more IKEA coffee table hacks
Want to Put a Mini Rave Inside Your Coffee Table? There’s a Hack for That!
Have you ever been so into a vacation that you don’t realize until afterward that you forgot to take pictures? I’ve done something similar with some past organizing projects. I…
This IKEA Hack Turns IKEA Kallax Units Into a Coffee Table With Serious Storage
We’ve been there—futile furniture hunting. Txetxu31 tells us, “We’d been looking for a medium-to-large coffee table with storage for a while,” he explains, “but we couldn’t find anything that met…

Genius IKEA LACK Side Table Hack That Looks 10x More Expensive
The IKEA LACK side table is a true legend, known for its affordability, simple design, and countless hacks. Some would say it’s a little too simple, but I say that’s…

36 IKEA LACK Side Table Hacks for Clever, Low-Cost DIYs
The IKEA LACK side table is as “IKEA” as it gets. Minimal. Particleboard exterior. “Honeycomb” interior. Easy to assemble. Now available in two sizes: the classic 21 5/8″ square for…

This Clever LACK Table Flip Turns It into the Perfect C-Shaped Side Table
This hack gives a whole new meaning to the idea of looking at something from a different perspective. When Jerry R.’s bedside LACK table wasn’t quite tall enough, she flipped…

This IKEA Side Table Hack Really Bowls You Over
Side tables come in handy for holding a cup of tea or a cocktail or displaying a vase of fresh flowers. They’re convenient and functional, and sometimes it’s easy to…