I’ll be honest—I’ve always had a complicated relationship with ironing. It’s one of those chores I’ll avoid until the wrinkles practically stage a revolt.
So, my trusty IKEA JÄLL folding board usually stays tucked away, collecting more dust than pressed shirts.
But what if you actually do iron regularly—yet still can’t stand wrestling with a bulky board that eats up half your laundry room?
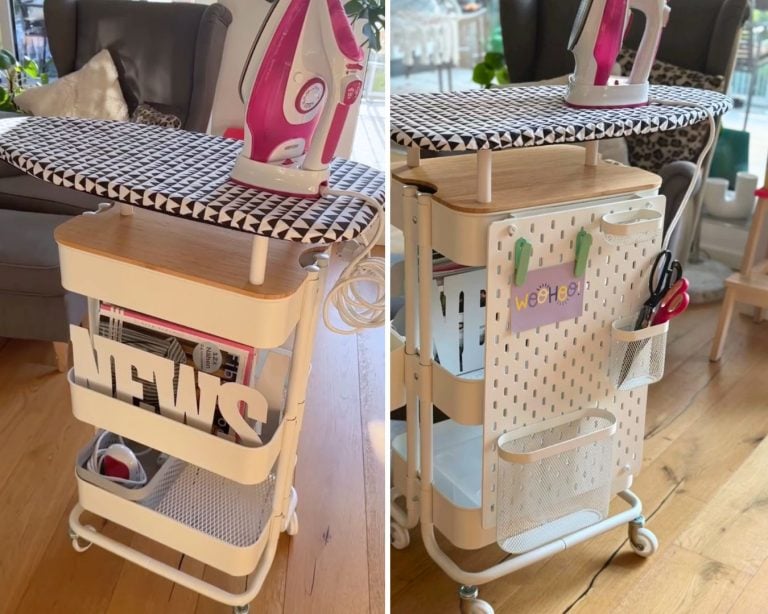
Enter the clever IKEA hack that turns the humble JÄLL ironing board into a mobile ironing cart that’s both compact and convenient.
In 2019, this convenient, space-saving ironing cart from Katja Kuitunen made a big impression. However, many people commented that it might be a bit too low for some.
Well, this updated hack from Josii @hirschkauz solves that issue and takes this DIY to new heights.
How to Hack the IKEA JÄLL Ironing Board Into a Mobile Ironing Cart
What You’ll Need
- 1 IKEA RÅSKOG utility cart with NORRÅVA lid
- 3 Furniture legs (Hacker had leftover legs from a MACKAPÄR cabinet)
- 1 IKEA JÄLL ironing board
- Cable ties
- Adhesive weatherstripping
- 3 IKEA KOMPLEMENT drawer liners
- IKEA SUNNERSTA containers
- 1 IKEA SKÅDIS pegboard (14 ¼” x 22”)
- Drill
- Foam padding
- Fabric
1. Add Legs to the JÄLL Ironing Board
Remove the cover and padding from the ironing board, leaving only the frame. Attach the three furniture legs to the bottom of the wire frame using cable ties through the holes.
Josii used leftover legs from a MACKAPÄR cabinet. She unscrewed the bottom of the legs so she could thread the bolts through the cart lid.
She recommends checking out IKEA’s spare parts locator online if you want to use the same legs. However, you could also likely find similar ones at a hardware store, or she also suggests simply using round wood pieces and attaching them with screws.
Once commenter (SilviaA. @silviaattenberger2) used a wooden broom handle that she cut into three 20-centimeter pieces. She pre-drilled holes at the top and the bottom, attaching it to the ironing board frame with washers.
2. Attach the Ironing Board to the Cart Lid
Drill holes in the NORRÅVA lid, and attach the board to it. Position the board on the top of the lid and screw the bolts in through the bottom of the lid. Add the weather stripping around the inside rim of the RÅSKOG utility cart so that the lid fits securely.
3. Complete the Mobile Ironing Cart and Accessorize
Cut the foam padding and fabric to size, then wrap them around the frame to complete the ironing board. Set up the cart with your ironing essentials and anything else you need.
Various organizers help add extra functionality to the piece. Josii added more organization and accessories using KOMPLEMENT drawer liners, SUNNERSTA containers, and the SKÅDIS pegboard.
How Much Does This Hack Cost?
The cart, lid, and ironing board are about $60 for all three. Add the foam padding, fabric, miscellaneous supplies, and some simple wooden legs, and you could recreate the basic mobile ironing cart hack for about $90.
If you decide to add more organization, just like Josii, you’d pay an extra $30 to $35, depending on how many containers you want. Of course, there are always ways to shave a few bucks off a hack. For example, you could find some of the larger pieces second-hand for a fraction of the cost, or perhaps you have leftover supplies and materials from other DIY projects.
What do you think of this hack? Does it give you everything you need to tackle your ironing to-dos?
Would you do anything differently, or maybe you have a different ironing hack? Share your idea for a chance to show off your creativity and get featured on the site!
NEXT: More IKEA craft room hacks
15 IKEA Crochet Hacks That Are Real Yarn Good
Calling all crochet lovers! This roundup is for you! Old-school pastimes, like baking, needlepoint, and, of course, crochet, are making a big comeback. Nowadays, people affectionately refer to these activities…
Fabric cutting & patterning table for a lot less
I decided to do this hack because I needed a sewing / fabric cutting table which was easily moveable and a bit larger than my current one. So I came…
Make a drop leaf table with storage in 5 minutes
Perfect fit! These two IKEA items merge into a drop leaf table with storage. I just came up with a solution for my studio — which is messy and full…
Craft desk organizer hack using SKÅDIS pegboard
I made a mobile craft desk organizer using the SKÅDIS pegboard and a plant stand. IKEA items used: 4 14″ x22″ SKÅDIS pegboards and their mounting supplies SKÅDIS pegboard |…
Bathroom mat to boho pillow. No sewing needed.
I spotted this luxurious bathroom mat in IKEA and it came in handy for my latest project — a boho pillow. The mat is SO soft and fluffy and is perfectly…
15 Tried & Tested Craft Room Storage and Organization Hacks
Hacks and ideas to solve your craft room storage woes. If there’s one thing I know about DIY, is that you need storage — storage for supplies, tools, leftover bits…


