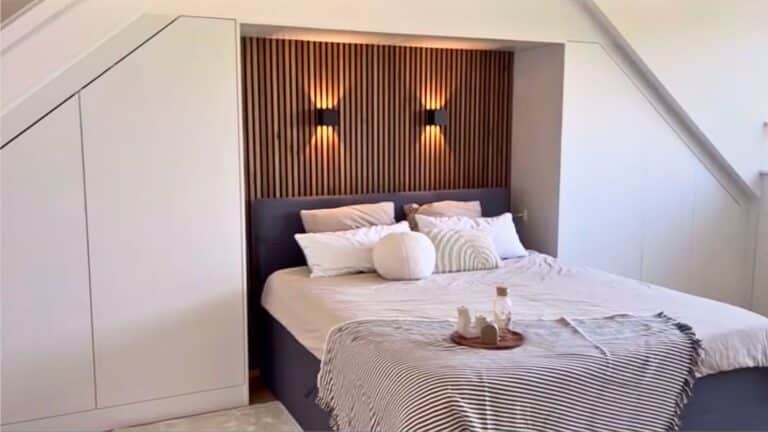
I’ve always loved the look of a pitched roof and thought about how lucky people were with attic space they could convert into a spare bedroom. But, undeniably, sloping ceilings make organizing belongings a challenge. Plus, if you’re already working with a smaller space, you can’t overlook any opportunities for extra storage.
This DIY overhaul from digital creators Wesley and Lisa, Interior & Styling (@huisjeop41) is an excellent example of how to maximize every inch of space. It stars the popular PAX wardrobe, which was one of the most-searched IKEA products of 2024 for a reason. It’s an IKEA legend and gets a complete makeover in this custom closet solution.
I personally love the PAX and used it in my first house as my primary closet. I trimmed it out to give it a built-in look and customized it with pull-out drawers, slide-outs, and more. This hack shows off even more PAX potential by turning the basic box into a gorgeous built-in, pitched-roof wardrobe.
What You’ll Need
- IKEA PAX frames — how many and the dimensions depend on the size of the area you want to fill
- Desired IKEA fittings for your PAX wardrobe
- Timber for base frame
- MDF
- Drill
- Screwgun
- Tape measure
- Pencil or chalk
- Level
- Circular saw
- Miter Saw
- Any additional tools necessary for PAX assembly, according to the instructions
See the PAX Wardrobe from a Whole New Angle
1. Build the Base Frame
Use timber to create a frame that will lift the PAX units off the floor, making it possible to trim them out without hindering the doors. Measure and cut the frame to match the dimensions of the PAX units you decide to use. (This sloped-ceiling closet hack gives you a more detailed look at the process.) The frame should include strips of timber on each outermost side.


2. . Measure and Cut the PAX to Size
Assemble your PAX according to the included instructions. Measure your space, carefully noting the accurate angle of the ceiling’s slope. This step varies depending on your unique space.
The PAX comes in different depths, widths, and heights. Before ordering, measure your space carefully to ensure you get the proper sizes for your project.
3. Attach the Units to the Base
Check the fit of your PAX units with your frame and space. Once you’re sure everything is accurate, secure the units to the frame and wall.
4. Make the Doors
After getting your PAX wardrobes in position so you know they’re the correct size, make the doors. Measure and mark the MDF to cut your doors, and install them using your desired hinges.
I would think you could also use the PAX doors (ordered separately on IKEA) and cut these to size. Then, you would have the included hardware and hinges to attach the doors.
5. Install Desired Fittings
The PAX system comes with tons of customization options, including shelving, drawers, clothing rods, and more. This is the time to assemble and install any fittings and accessories you purchased for your closet.
Since the creator’s closet flanks their bed, they have a place on the sides for plugs. You could also drill holes to access outlets that are on the walls behind the units.
6. Trim Everything Out
The final step is the trim. Cut MDF to size to trim out the bottom, top and sides of your pitched-roof wardrobe. When everything is in place, paint or stain as desired and add any finishing touches.
Measure Twice, Maybe More, Before You Cut
I find the most crucial part of this project if you want it to look as amazing as in the original post is paying very close attention to your measurements. Test and fit everything you can as much as possible before you start making cuts.
Overall, you’re likely to spend around $1,000 on this DIY (more if you opt for lots of fun fittings). It sounds like a lot, but you’re getting a stunning custom closet that would normally cost several thousand dollars easily. Still, you don’t want to make any wrong moves and end up having to buy replacement frames.
A Custom Closet That Makes You Drool
I think the finished project looks absolutely amazing, especially with the OP’s gorgeous slat wall and sconces. It definitely shows how you can make this project your own.
See more of this hack in action here, and find tons of extra inspiration for designing and styling your home’s interior spaces by following @huisjeop41.
Itching for more bedroom storage hacks? Or maybe you’ve already found the perfect solution for your unique space? If so, share it with us, and your fabulous project might be featured next.

