A few years ago, I moved into an apartment with built-in bookshelves, and my IVAR shelving system was suddenly jobless.
Instead of selling it, I grabbed some stain, a few pieces of lumber, and turned it into a bar cabinet.
Here’s exactly how I did it.
IKEA IVAR Open Shelving to Home Bar Cart
Step One: Staining and Finishing
First things first — I stained all the IVAR cabinets and shelves to match my dining table. This single step made the IVAR fit into my overall home decor.
Use a pre-stain wood conditioner before you do anything else. Pine is notoriously blotchy without it. Follow up with two coats of stain and a clear protective topcoat, and you’re golden.
Pro tip: Test stain samples on a pine offcut next to your existing furniture before committing — the same stain can look completely different under natural versus artificial light.
Step Two: Enclosing the Sides and Back
Open shelving works great for books. For a bar cabinet, you want something that feels more like furniture. I had wood cut at Home Depot for the side panels and back panel — most locations will make straight cuts in-store, which is a huge time-saver if you don’t have a full workshop setup.
Adding those panels completely changed the silhouette, turning it into a proper cabinet rather than an open shelving unit.
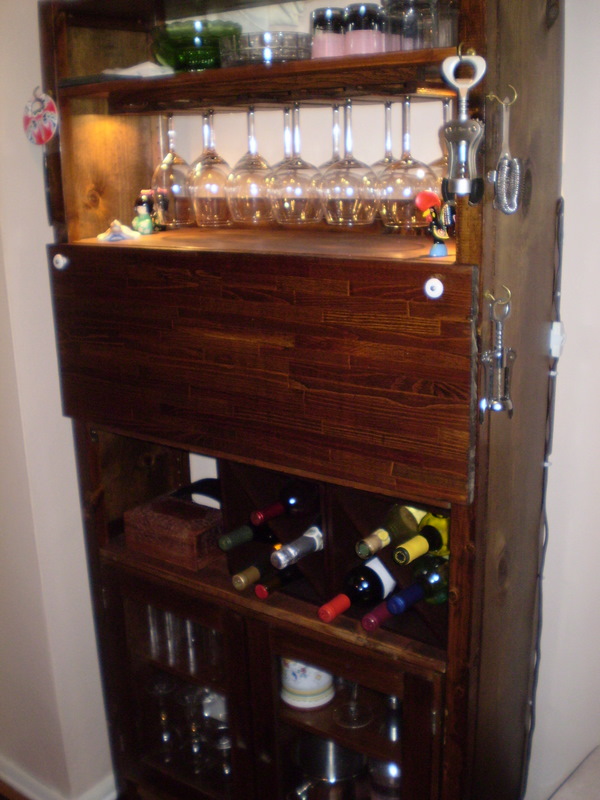
Step Three: The Swing Shelf

My favorite detail. A fold-out surface that becomes a mixing station when you need it and tucks away when you don’t. The mechanism is simple. I merely used a chain with eye hooks to keep the table level. I attached the fold-out table to the IVAR shelf using hinges. The gold adds a bit of bling.
Step Four: Secure Your Shelves (Don’t Skip This)
I secured the middle three shelves to the frame with L-brackets, and it’s absolutely necessary for this IKEA IVAR hack. It’s a quick, affordable extra step that reduces the risk of a crashing-glassware disaster.
Step Five: The Details That Make It
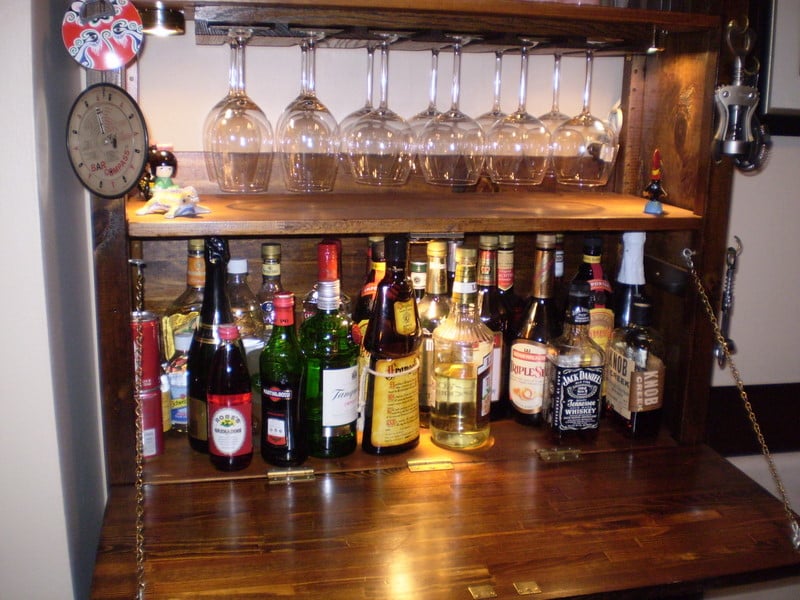
- Stemware rack mounted to an upper shelf for glasses. I chose a wooden rack to blend with the IVAR cabinet
- Shelf Lighting that makes the bar look amazing and inviting
- IVAR cabinet with door at the bottom for storing additional stemware and barware, dust-free and visible
- Hardware throughout from Home Depot — pulls, hinges, brackets.
I’ve mixed many a drink on that swing shelf, and now I’m in a different apartment with a different dining table and bookshelves (BILLY, of course) – but the bar came with me!

~ Steve