
I’m pretty sure that it’s a requirement for anything with a long handle (broom, shovel, rake) to fall whenever you prop it against a wall.
You know what I mean.
If you don’t have a good way to organize these things, they make a mess. And, floor racks take up space, so a wall-mounted solution is golden.
Wall-Mounted Garden Tool Storage Rack Hack
Karthik wanted to organize their garden shed, especially the long-handled tools. They also wanted to keep the floor as clear as possible, so they decided to hack IKEA’s TJUSIG coat racks.
“I was looking to organise my garden shed so that my wife and I can easily pick up the long-handled tools. Also, we wanted to save space and did not want to place them in a tool rack on the ground,” he explained how the hack came about.
Karthik opted for this idea instead of buying wall-mounted tool storage because they happened to have a couple of coat racks collecting dust in their attic and wanted to put them to good use.
The idea is clever, quick, simple, and affordable — all really good qualities for a DIY and repurposing project if I do say so myself.
It takes about 25 minutes and costs less than $35 (assuming you don’t have a couple of TJUSIG racks lying around).
But it also gives your tool storage a more distinctive look than the typical store-bought solutions.
What You’ll Need

- 2 IKEA TJUSIG coat hangers
- Allen wrench (if you purchase the TJUSIG racks, they come with the appropriate Allen key.)
- Level
- Basics — tape measure, drill, screw gun
Garden Tool Storage as Easy as 1, 2, 3!

1. Move Every Other Hook
Unscrew every other hook on each rack and screw them to the opposite side. The idea is to get all the hooks on the same side.
2. Mount the Racks
Measure and use a level to determine where you need to hang the racks. Make sure they line up so your tools sit straight, and mark those points.
Also, verify that the mounting hooks on each rack are on the appropriate side, depending on how you plan to hang them. Install the screws and mount the racks.
3. Oh, Sorry, Were You Expecting Another Step?
That’s it! You can prep and install this hack in two steps! If you really need a step three, pat yourself on the back and load up your new rack with tools.
Finer Details on the Garden Tool Organizer
This hack took the creator about 10 minutes to move the hooks and another 15 minutes to measure, center, and mount the racks. Karthik loves the minimalist look of the finished project, but of course, they primarily used the TJUSIG racks because they already had them.
If you decide to replicate the hack, Karthik offers this heads up — relocating the hooks means you’ll lose the use of those dowels.
But, to compensate, if you really want to, you can drill holes to use the dowels on the opposite side. However, they mention that it isn’t necessary, and for them, “it is an overkill … a hack must be simple and functional.”
So far, Karthik says the garden tool rack works great, and there’s nothing they would change. However, their 5-year-old has a complaint — she can’t reach the broom. Oh, well, you can’t please everyone, right?
Ready to Build A Garden Tool Wall Rack?
What do you think? Could you use a hack like this at home? It definitely makes it easier to grab garden tools quickly and keeps everything looking nice and tidy.
You could also use it for other long, awkward items that you want to keep off the floor, like pool noodles. Those things flip and flop everywhere!
Interested in some other TJUSIG hacks? Turn it into a toilet paper holder, or use it for coats, but add a cool backlight. If you need more garden tool storage, check out this DIY tool closet.
NEXT: Check out more ideas and hacks for tool storage.
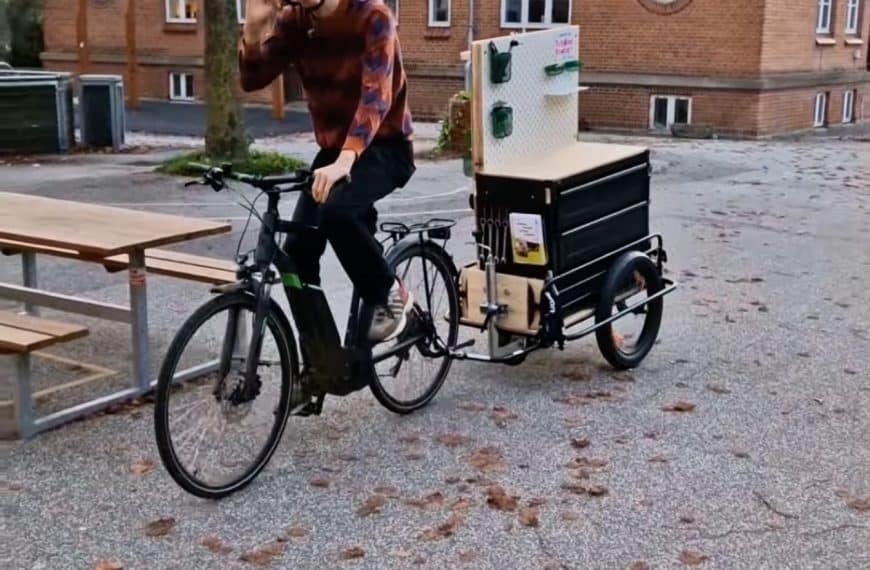
This Tiny Workshop on Wheels Is an IKEA Hack Anyone Can Build
Andreas Larsen wanted a way to bring his bike repair setup to festivals, markets, and events around town without spending a small fortune to do it. Traditional event cargo bikes…

5 Simple Tool Organizers for the Home Workshop
Are you tired of having your tools cluttered on your garage shelves? These five creative DIY tool organizers and racks will transform your workspace. You can easily repurpose IKEA items…

Behind the Lens: One Photographer’s DIY Tether Cart Project
I am a photographer and opened my studio in Vienna in 2022. Since then, I used a RÅSKOG cart with the HÖGSMA top to put my laptop during photoshoots (with…

Electronics Workbench, A fully equipped & concealed lab
Transforming a PAX wardrobe into a concealable, fully equipped electronics workbench. I am passionate about electronics, fixing and repairing things. However I live in an apartment and don’t have a…

This hack really takes the cake — frosting — that is
My wife was making cake frosting and we didn’t have a hand mixer or power blender. And I thought using a whisk is too time-consuming. But I have an IKEA…

A movable workbench for the workshop or craft room
I decided to hack a movable workbench when I moved from an apartment with a small room as a workshop. Now I have a bigger room and I can move…