
Spoiler alert: This hack might give you a sweet tooth, but hey, at least this kind of treat is calorie-free!
Playtime is what being a kid is all about, and pretend play is a big part of how children learn about the world.
Toy kitchens, grocery stores, and cafes are popular additions to the playroom scene, but those fancy setups often come with a not-so-playful price tag.
But have no fear, we scooped up a clever IKEA hack that’s as delightful as it is budget-friendly.
With just a LACK TV stand and a few NOJIG bins, Marlena Schubert @schuberts_haustagebuch whipped up a super cute toy ice cream cart that looks good enough to eat — and even better in your backyard.
What You’ll Need
- 1 IKEA LACK TV unit (IKEA Germany — see step one for options)
- 3 IKEA NOJIG storage bins (4” x 7¾” x 2”)
- 1 IKEA NOJIG storage bin (4” x 4” x 2”)
- 1 VARIERA bag dispenser
- Texture paste
- Acrylic paint
- StyrofoamTM balls
- Kinetic sand (optional)
- Play cones, scoop, and accessories
- Basics — tape measure, pencil, jigsaw, drill, paintbrushes
You Scream, I Scream for This Ice Cream Cart Hack

1. Assemble the Table
Assemble the LACK following IKEA’s instructions. Marlena used the LACK TV unit, which is available from IKEA Germany for about $17. The US version is slightly longer and comes in at $50, or you could try it with the less expensive BAGGEBO unit ($25).
The top is thinner, so you may need to add a plywood frame or some trim around the top to beef it up a bit. But the trade-off is that you get a few cubby spots for extra accessories and toys.
Alternatively, the 2 LACK side tables will also work, and you can play with different ice-cream tub layouts – 4×2 or 3×3 will be pretty sweet.
2. Make the Cutouts for Ice-Cream Bins
Trace the bottom of the NOJIG containers onto the top of the LACK to mark where you want the cut-outs.
You want to use the bottom of the bins so the cutouts are slightly smaller than the tops. The bin will rest right atop the opening instead of slipping through it. Use the tape measure to determine the spacing.
Drill holes at the cutout corners to act as guides, then cut along the lines with the jigsaw. Remove the honeycomb filler, and you’re one step closer to opening your ice cream shop.
3. Create Your Pretend Ice Cream
Marlena used texture paste mixed with acrylic paint to create the look of ice cream in the bins. Then, she painted StyrofoamTM balls in matching colors to become yummy-looking ice cream scoops. Alternatively, she also shares a version with kinetic sand, which adds even more interactive fun.
4. Attach the Cone Holder
Cut the IKEA VARIERA bag dispenser so you have a row of holes and part of the back. Attach it to the front of the LACK to make the waffle cone holder. Marlena credited Samuela Heil @sammydemmy, thanking them, “for that clever touch.”
5. Embellish the Toy Ice Cream Cart
Toy waffle cones, an ice cream scoop, and a pretend cash register to complete the toy ice cream stand. You could also add a pennant banner or cute sign to give it your own personal touch.
How Much Does This Hack Cost?
All together, Marlena spent about $25 to $30. You could pull this hack off for about $40 to $70, depending on what base table you decide to use. But, that’s also if you’re buying everything new.
Therefore, consider repurposing a used LACK or similar table. You may have one, or a friend’s getting rid of something similar, or you find a great bargain in your local IKEA’s As-Is section. You could also potentially snag a piece in good condition from places like Facebook Marketplace, which would significantly cut down your cost.
Go Beyond Ice Cream
This idea would work well for other concepts, like a taco stand, a sandwich shop, or a retail pop-up. So if your little ones prefer to open a food truck or run a make-your-own jewelry kiosk, go for it.

When my son was younger, he probably would have made it a pizzeria with different toppings in each bin. Kind of a build-your-own pizza deal. What would your kids want to make?
Here’s the hack in action! Follow Marlena @schuberts_haustagebuch, and check out more of her clever DIY projects and inspiring design transformations.
NEXT: See more clever IKEA hacks for kids.

I’m a Teacher and These Are the Top 10 IKEA STEM Toys I Recommend
After teaching preschool for over 15 years and becoming a mom, I can confidently say I’ve seen a lot of toys. Many parents prefer to get their kids toys with…
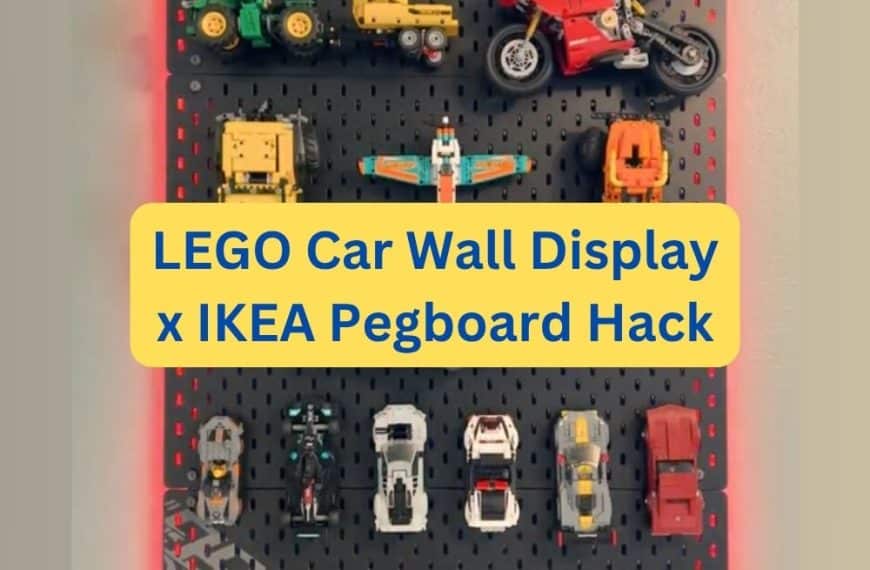
This Clever Mom Creates an Easy LEGO Car Display in Minutes
If your home is anything like mine, LEGO cars seem to multiply overnight. They race across tables, line up on shelves, and occasionally crash-land under the sofa. We have countless…
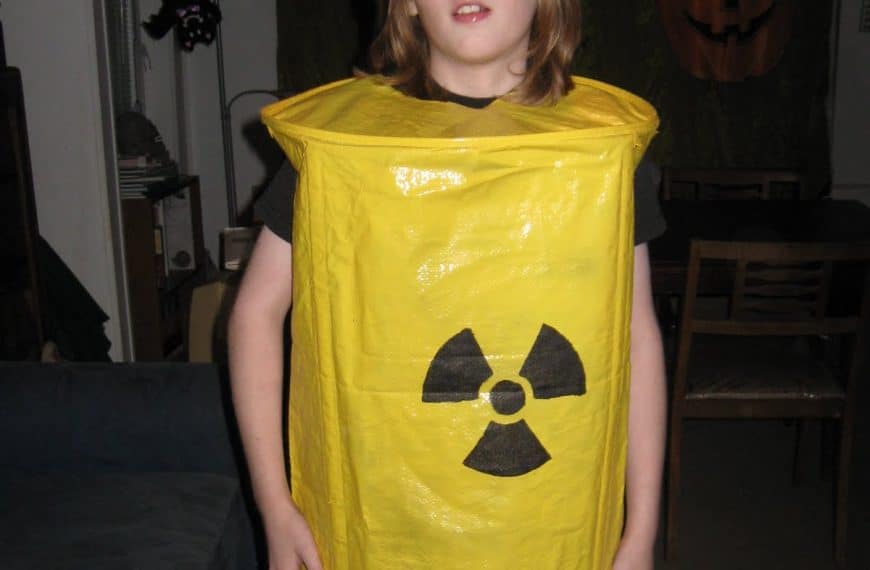
Toxic Waste Never Looked This Cute — DIY Barrel Costume Tutorial
This DIY barrel costume idea is quick, creative, and budget-friendly. Rebecca’s son wanted something unique for trick-or-treating, and she turned to IKEA for an unexpected solution. The result? A toxic…
This Simple IKEA Flip Kept My Kids Busy for Hours
One of the fun (and constant) challenges of parenthood is figuring out how to keep the kids entertained without draining your wallet. Toys and play tables add up fast—a decent…

Parents: Stop Saying “Don’t Draw on the Walls”—Do This Instead
Do you have a little Picasso at home who can’t wait to paint and color at every opportunity (even if it’s on the walls)? Before you end up scrubbing crayon…

Cutest BBQ on the Block — and It’s for the Kids!
Attention, barbecue lovers, if kids are coming to the party, don’t fire up the grill until you’ve checked out these DIY toy grills. Summertime barbecues are a highlight of the…